# React 进阶(3)-上手实践 Redux-如何改变 store 中的数据
# 快速导航
# 前言
在前面的一文React 进阶(2)-上手实践 Redux-如何获取 store 的数据当中,已经知道组件怎么获取 store 的数据,并渲染到页面上,那么在该节当中揭示怎么更改 store 的数据,实现页面的更新
您将在本文当中学到
- 编写
action代码,确定具体要做的事情,它只负责创建对象 - 改变
store数据的唯一方法就是要派发action,需要通过调用store.dispatch函数 reducer纯函数中实现数据更新等逻辑判断操作- 触发
store,注册订阅subscribe函数,监听store数据的变化,保持页面的状态与store的同步 - 重新获取
store的数据,最终实现页面数据状态的更新 ......
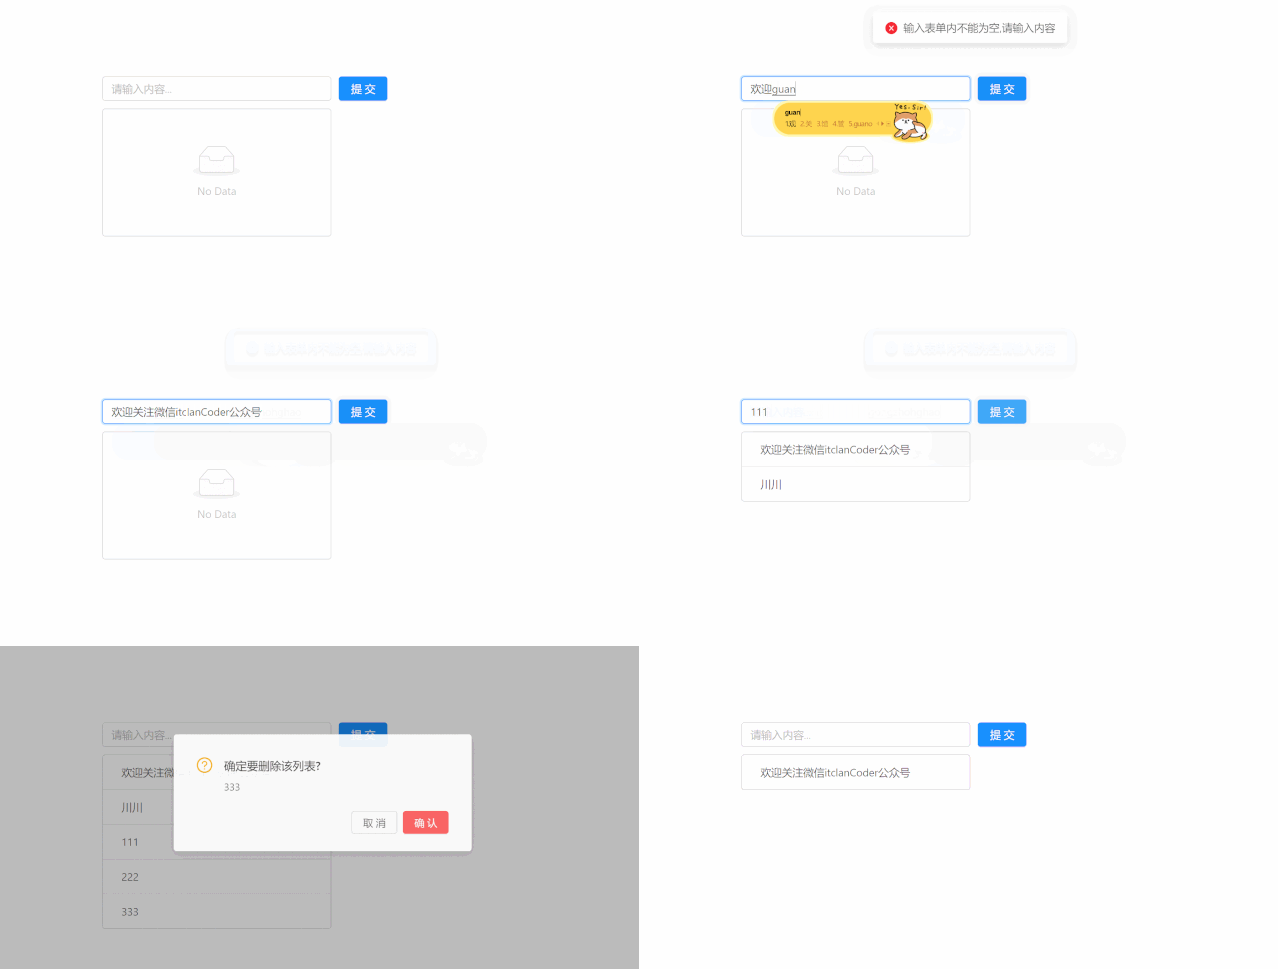
下面就一起来编写 todolist 的添加,删除等代码的,最终的效果图如下所示
# 如何改变 store 的数据,实现页面的更新?
在前文的示例代码中已经知道组件怎么从store中取数据了,然而现在,如果想要更新state的数据?怎么办?
在reducer函数接收的第二个参数action就是接下来要干的事情了
在Redux中为了能够查看store中的各个状态,在 chrome 浏览器需先安装一个redux Devtools这个调试工具
当然安装这个插件,需要科学上网.如果没有的话,在 qq 浏览器的插件市场里也是能够找得到的
qq 浏览器各种插件也是应有尽有,与在 chrome 控制台里调试是一样的
方式一:创建 store 的时候,进行 composeEnhancers 构建增强型的应用,在代码里添加配置
将window.__REDUX_DEVTOOLS_EXTENSION__ && window.__REDUX_DEVTOOLS_EXTENSION__(),这行代码配置添加到createStore()的第二个参数上
const store = createStore(
  reducer,
  window.__REDUX_DEVTOOLS_EXTENSION__ && window.__REDUX_DEVTOOLS_EXTENSION__()
); // createStore第二个参数添加这个redux-devtools的配置可以开启调试功能
2
3
4
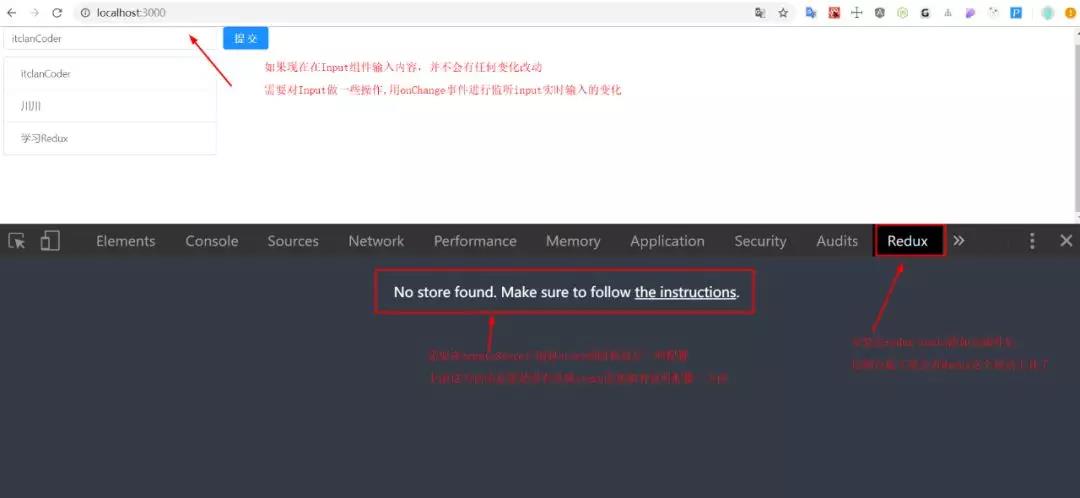
(需要浏览器安装redux-devtools插件)
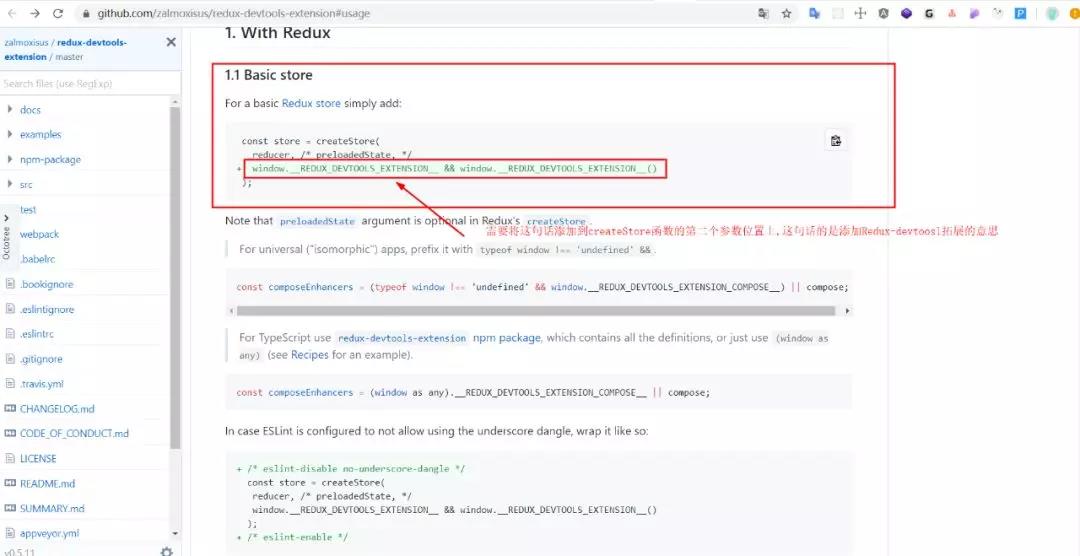
(需要按照文档,对创建的store仓库配置一下)

(配置完后,刷新浏览器Redux调试工具就会出现了)
方法二:终端下安装 redux-devtools-extension
npm install --save redux-devtools-extension
然后在主页面入口代码里,添加redux-devtools-extension拓展,同时引入applyMiddleware应用中间件,并在componseWidthDevTools中调用,如下所示
import { createStore, applyMiddleware } from 'redux';
import { composeWithDevTools } from 'redux-devtools-extension';

const store = createStore(reducer, composeWithDevTools(applyMiddleware()));
2
3
4
以上两种方法都可以开启Redux的调试功能,第二种方法比较强大,推荐使用,这种配置完后,在各个浏览器都是可以使用的,至于其他一些额外拓展功能的,在后续的文章中,会不断会讲到
具体更改store的实例代码如下所示:
import React from 'react';
import ReactDOM from 'react-dom';
import { Input, Button, List } from 'antd'; // 引入antd组件库
import 'antd/dist/antd.css'; // 引入antd样式

// 1. 创建一个store管理仓库,从redux库中引入一个createStore函数
import { createStore } from 'redux';

// 2. 引入createStore后,store并没有创建,需要调用createStore()后才有store
const store = createStore(
  reducer,
  window.__REDUX_DEVTOOLS_EXTENSION__ && window.__REDUX_DEVTOOLS_EXTENSION__()
); // 创建好reducer后,需要将reducer作为参数传到createStore当中去,这样store才能拿到reducer的state数据

// 3. 创建reducer函数,管理组件共享的数据状态以及一些动作
// reducer是一个纯函数,返回一个新的state给store
// 4. 初始化state值,将原先组件内部的状态的数据,移除到reducer里面去管理
function reducer(
  state = {
    inputValue: 'itclanCoder',
    list: ['itclanCoder', '川川', '学习Redux'],
  },
  action
) {
  console.log(state, action);
  if (action.type === 'handle_Input_Change') {
    // 对原有的上一次的state做一次深拷贝,在Redux中,reducer不允许直接修改state
    // const newState = Object.assign({}, state);这个Object.assign()也是一个非常常用浅拷贝的方法,与下面的方法最终实现的效果是一致的,等价于下面的方法
    // 创建了一个newState完全复制了state,通过对newState的修改避免了对state的修改
    const newState = JSON.parse(JSON.stringify(state));
    newState.inputValue = action.value; // 将新的value值赋值给newState
    return newState;
  }
  return state;
}

// TodoList组件
class TodoList extends React.Component {
  constructor(props) {
    super(props);
    // 5. 在组件内部通过getState()方法就可以拿到store里面的数据
    this.state = store.getState();
    // this环境的绑定
    this.handleInputChange = this.handleInputChange.bind(this);
    this.handleStoreChange = this.handleStoreChange.bind(this);
    // 触发订阅,让store感知到state的变化
    store.subscribe(this.handleStoreChange); // 接收一个函数,重新获取store最新的数据,subscribe里面必须接收一个函数,会自动的调用this.handleStoreChange这个方法,保持store上的状态和this.state的同步,否则是会报错的,这个订阅函数放在componentWillMount或者componentDidMount生命周期函数内监听数据的变化,只要store状态发生了改变,那么就会调用这个handleStoreChange函数
  }
  // componentWillMount(){
  // store.subscribe(this.handleStoreChange);
  // }
  // 组件卸载,移除时调用该函数,一般取消,清理已注册的订阅,定时器的清理,取消网络请求,在这里面操作
  componentWillUnmount() {
    store.unsubscribe(this.handleStoreChange); // 取消订阅,清理已注册的监听
  }

  render() {
    return (
      <div style={{ margin: '10px 0 0 10px' }}>
        <div>
          <Input
            onChange={this.handleInputChange}
            value={this.state.inputValue}
            style={{ width: '300px', marginRight: '10px' }}
            placeholder="请输入内容..."
          />
          <Button type="primary">提交</Button>
        </div>
        <List
          style={{ width: '300px', marginTop: '10px' }}
          bordered
          dataSource={this.state.list}
          renderItem={(item) => <List.Item>{item}</List.Item>}
        />
      </div>
    );
  }

  handleInputChange(e) {
    console.log(e.target.value);
    // 定义action,确定一个操作,动作,注意action必须遵循一定的规范,是一个对象,type字段是确定要做的动作,类型,监听表单输入框的变化,value是输入框的值
    const action = {
      type: 'handle_Input_Change',
      value: e.target.value,
    };
    store.dispatch(action); // 通过store派发dispatch一个action,只有这里接收一个action,Reducer里面才能对新旧数据进行计算等操作,改变store中状态的唯一方法就是派发action
  }

  handleStoreChange() {
    console.log('handleStorechange,触发了');
    this.setState(store.getState()); // 触发setState重新获取store的数据,让input的数据与store保持同步了的
  }
}
const container = document.getElementById('root');

ReactDOM.render(<TodoList />, container);
2
3
4
5
6
7
8
9
10
11
12
13
14
15
16
17
18
19
20
21
22
23
24
25
26
27
28
29
30
31
32
33
34
35
36
37
38
39
40
41
42
43
44
45
46
47
48
49
50
51
52
53
54
55
56
57
58
59
60
61
62
63
64
65
66
67
68
69
70
71
72
73
74
75
76
77
78
79
80
81
82
83
84
85
86
87
88
89
90
91
92
93
94
95
96
具体的效果如下所示
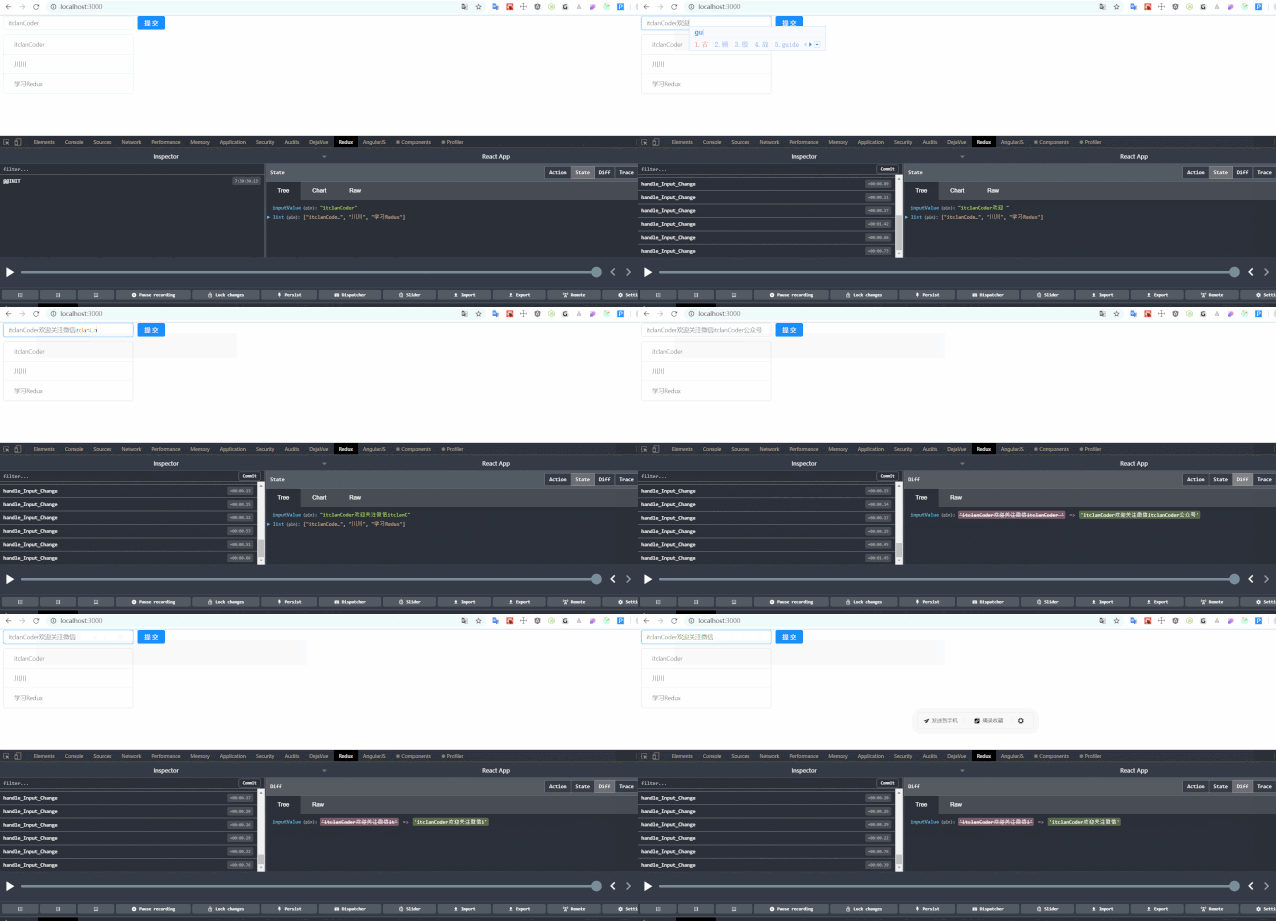
再次来梳理一下更改store的数据的一个过程,经历了哪些具体操作
- 浏览器里添加
redux-devtools,在创建store的createStore()的第二个参数中添加redux-devtools插件的配置,使浏览器支持Redux查看store的各种状态
const store = createStore(
  reducer,
  window.__REDUX_DEVTOOLS_EXTENSION__ && window.__REDUX_DEVTOOLS_EXTENSION__()
);
2
3
4
- 给
Input组件绑定onChange事件监听事件处理函数
定义action对象,确定动作类型,这个action必须遵循一定的规则,得是一个对象,当然在后续当中,怎么支持函数,又是另外的知识了的
- 通过
store的dispatch方法,接收action对象,告知store,有action这么一个事件动作,改变store中的状态的唯一方法就是派发action如下实例代码所示
<Input onChange={this.handleInputChange}>

handleInputChange(e){
   const action = { // 定义action,action必须是一个对象
       type: 'handle_input_change',
       value: e.target.value
   }
   store.dispatch(action); // 派发dispatch,将action传递给store
}
2
3
4
5
6
7
8
9
- 在
Reducer中会接收到action,通过if等判断,确定要执行state的操作,这个reducer必须是个纯函数,要有返回值,返回的结果会返回给store,这里的state是上一次(原先)组件的状态 这里需要格外注意的是:
reducer可以接收state的值,但是不能直接修改state的值,当拿到state的数据后,需要先拷贝一份原先 state 的数据,在拷贝出新的数据基础上进行操作
创建了一个newState完全复制了state,通过对newState的修改避免了对state的修改
function reducer(state, action){
     if(action.type ==== 'handle_input_change'){
          // 对原有的state进行一个深拷贝,在redux中,redux是不允许直接修改state的,但可以接收state,这也是为什么当我们拿到state后,我们需要拷贝一份数据,一个新的state出来
         // const newState = Object.assign({}, state);这个Object.assign()也是一个非常常用浅拷贝的方法,与下面的方法最终实现的效果是一致的
          const newState = JSON.parse(JSON.stringify(state));
          newState.inputValue = action.value;
          return newState; // 返回新的state
     }
     return state;
}
2
3
4
5
6
7
8
9
10
其中值得一提的就是拷贝数据对象的方法:
Object.assign({}, state);
// 等价于
JSON.parse(JSON.stringify(state));
2
3
- 当执行上述的操作后,当组件想要感知
store的变化,需要在constructor函数内或者componentWillMount(在 react17 版本中将会被废弃)或componentDidMount生命周期函数内调用store的subscribe方法
个人推荐放在constructor或者componentDidMount中
同时它接收一个函数 这个其实是设计模式的订阅者模式,触发store的订阅,当store发生了变化,会自动的执行该函数
保持store上的状态和this.state的同步,监听数据的变化,只要store状态发生了改变,那么就会调用这个handleStoreChange函数
subscribe(listener),用于注册回调,监听state的变化
store.subscribe(this.handleStoreChange) // 这里面接收一个listen函数,主要用来获取新的store,这句代码放在constructor或者componentwillMount以及componentDidMount中都是可以的
handleStoreChange(){
    this.setState(store.getState())
}
2
3
4
- 最后在组件移除时,销毁时,在
componentWillUnmount中取消store的订阅事件
// 组件卸载,移除时调用该函数,一般取消,清理已注册的订阅,定时器的清理,取消网络请求,在这里面操作
    componentWillUnmount(){
        store.unsubscribe(this.handleStoreChange);
    }
2
3
4
通过以上六个步骤,就完成了一次 store 的更新操作
你可以联想到我们之前举到的那个换房的例子的,租户(组件)怎么获取拿到房源具体信息,首先房产中介经理会从内部的系统(redux)中,引入一个createStore的方法,进而创建一个store的仓库,随之创建一个实时记录本(reducer)
真正的新老房信息的变更操作都是在reducer这个函数中完成的,并且它是一个纯函数,必须要有返回值
在Reducer函数中,接收两个参数,第一个是上一次组件的状态值,而第二个是组件具体的动作action,具体要干的什么事情
在reducer中,规定只能读取state的数据,并不能直接修改state的数据,而且返回的结果是根据state与action(用户指定的动作)共同决定
其最新的结果返回给房产中介经理手中(store),在 reducer 创建完之后,必须要将 reducer 作为参数,让 createStore 函数接收,这样 store 才真正的拥有了 state 的数据
那么此刻,租户(组件)想要获取房源信息,则引入store,在一开始constructor函数或者componentWillMount函数中,调用getState()方法,从而获得了state的数据,最终显示到页面上
而如果想要更改 store 的数据,租户想要换携带有沙发,电视等大房子,这个具体的动作就是 action,首先换房子是一个动作,在元素上绑定相应的事件
在该监听事件内,定义一个 action 动作,确定要做的事件类型,这个 action 必须遵循一定的规则,必须是一个对象
定义好action动作后,store接收到这个action动作请求后,store想要获取它的具体信息,便会派发一个使者dispatch,同时携带上action的具体动作信息,作为参数传递给dispatch方法
这样的话store就真正的知道了具体的动作,而具体的数据变更等操作,需要在 reducer 这个实时记录本中进行变更操作,在 reducer 里面进行一些逻辑判断操作
并且在reducer中只能读取state,并不能修改,如果想要修改,需要拷贝一份state出来,在新的 state 基础上进行操作,同时也要将这个新的 state 进行返回.达到一个以新换旧的操作
最后在组件中如何感知到 store 的变化,实现数据的同步更新呢,在 redux 中,需要在组件内的constructor或者componentWillMount,componentDidMount函数中进行触发subscribe()函数
同时它必须接收一个函数,触发store的订阅,在这个接收的函数当中重新获取一次store的数据,保持视图的this.state与store仓库的state数据的同步更新
这样的话,最终就完成了一次action的动作,页面也随之更新了
上面的代码进行了一次action,reducer的编写,下面接着继续的,做得并不完整,那怎么实现一个添加内容的操作呢
输入框表单内添加内容,点击右侧的提交按钮,将 Input 框的内容添加到底下的列表当中 具体效果如下所示
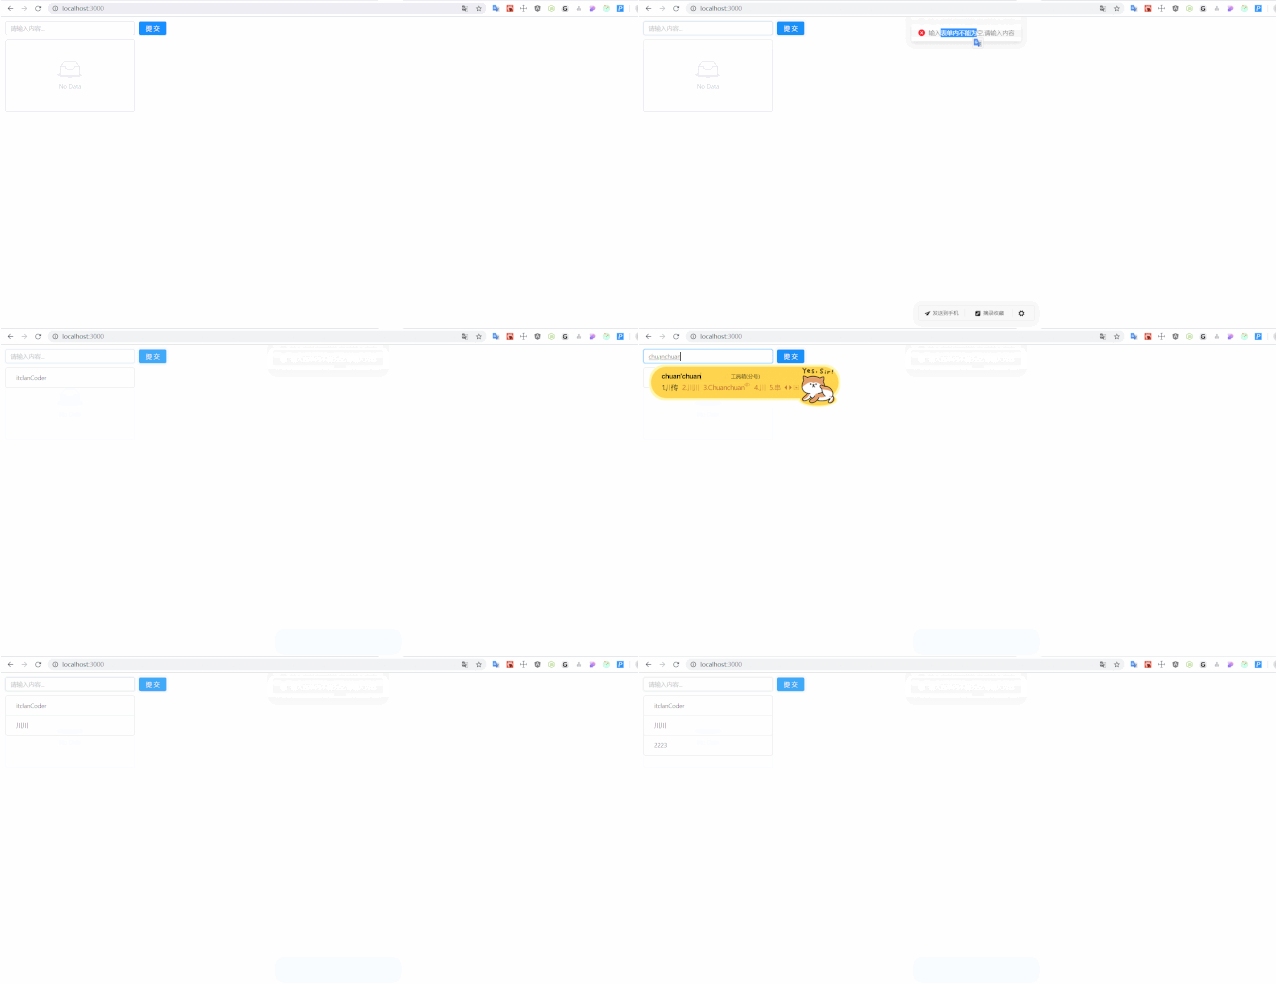
(添加list操作)
以下是完整的具体代码
import React from 'react';
import ReactDOM from 'react-dom';
import { Input, Button, List, message } from 'antd'; // 引入antd组件库
import 'antd/dist/antd.css'; // 引入antd样式

// 1. 创建一个store管理仓库,从redux库中引入一个createStore函数
import { createStore } from 'redux';

// 2. 引入createStore后,store并没有创建,需要调用createStore()后才有store
const store = createStore(
  reducer,
  window.__REDUX_DEVTOOLS_EXTENSION__ && window.__REDUX_DEVTOOLS_EXTENSION__()
); // 创建好reducer后,需要将reducer作为参数传到createStore当中去,这样store才能拿到reducer的state数据

// 3. 创建reducer函数,管理组件共享的数据状态以及一些动作
// reducer是一个纯函数,返回一个新的state给store
// 4. 初始化state值,将原先组件内部的状态的数据,移除到reducer里面去管理
function reducer(
  state = {
    inputValue: '',
    list: [],
  },
  action
) {
  console.log(state, action);
  if (action.type === 'handle_Input_Change') {
    // 对原有的上一次的state做一次深拷贝,在Redux中,reducer不允许直接修改state
    // const newState = Object.assign({}, state);这个Object.assign()也是一个非常常用浅拷贝的方法,与下面的方法最终实现的效果是一致的,等价于下面的方法
    const newState = JSON.parse(JSON.stringify(state));
    newState.inputValue = action.value; // 将新的value值赋值给newState
    return newState;
  }
  if (action.type === 'addInputcontent') {
    const newState = JSON.parse(JSON.stringify(state));
    if (newState.inputValue === '') {
      message.error('输入表单内不能为空,请输入内容');
    } else {
      newState.list.push(newState.inputValue); // 往list数组中添加input的内容
      newState.inputValue = '';
      return newState; // 返回newState
    }
  }
  return state;
}

// TodoList组件
class TodoList extends React.Component {
  constructor(props) {
    super(props);
    // 5. 在组件内部通过getState()方法就可以拿到store里面的数据
    this.state = store.getState();
    // this环境的绑定
    this.handleInputChange = this.handleInputChange.bind(this);
    this.handleStoreChange = this.handleStoreChange.bind(this);
    this.handleAddClick = this.handleAddClick.bind(this);
    // 触发订阅,让store感知到state的变化
    store.subscribe(this.handleStoreChange); // 接收一个函数,重新获取store最新的数据,subscribe里面必须接收一个函数,否则是会报错的,这个订阅函数放在componentWillMount生命周期函数内调用操作也是可以的
  }
  // componentWillMount(){
  // store.subscribe(this.handleStoreChange);
  // }
  render() {
    return (
      <div style={{ margin: '10px 0 0 10px' }}>
        <div>
          <Input
            onChange={this.handleInputChange}
            value={this.state.inputValue}
            style={{ width: '300px', marginRight: '10px' }}
            placeholder="请输入内容..."
          />
          <Button type="primary" onClick={this.handleAddClick}>
            提交
          </Button>
        </div>
        <List
          style={{ width: '300px', marginTop: '10px' }}
          bordered
          dataSource={this.state.list}
          renderItem={(item) => <List.Item>{item}</List.Item>}
        />
      </div>
    );
  }

  handleInputChange(e) {
    console.log(e.target.value);
    // 定义action,确定一个操作,动作,注意action必须遵循一定的规范,是一个对象,type字段是确定要做的动作,类型,监听表单输入框的变化,value是输入框的值
    const action = {
      type: 'handle_Input_Change',
      value: e.target.value,
    };
    store.dispatch(action); // 通过store派发dispatch一个action,只有这里接收一个action,Reducer里面才能对新旧数据进行计算等操作,这是改变store数据的唯一的方法,必须要通过派发一个action给store
  }

  handleStoreChange() {
    console.log('handleStorechange,触发了');
    this.setState(store.getState()); // 触发setState重新获取store的数据,让input的数据与store保持同步了的
  }

  // 添加列表的操作
  handleAddClick() {
    console.log('添加按钮执行了');
    // 定义action动作
    const action = {
      type: 'addInputcontent',
    };
    store.dispatch(action); // 还要将action传递给dispatch,这样store才会接收到,这是改变store数据的唯一的方法,必须要通过派发一个action给store,必不可少的一步
  }
}
const container = document.getElementById('root');

ReactDOM.render(<TodoList />, container);
2
3
4
5
6
7
8
9
10
11
12
13
14
15
16
17
18
19
20
21
22
23
24
25
26
27
28
29
30
31
32
33
34
35
36
37
38
39
40
41
42
43
44
45
46
47
48
49
50
51
52
53
54
55
56
57
58
59
60
61
62
63
64
65
66
67
68
69
70
71
72
73
74
75
76
77
78
79
80
81
82
83
84
85
86
87
88
89
90
91
92
93
94
95
96
97
98
99
100
101
102
103
104
105
106
107
108
109
110
111
112
113
上面的代码就完成一个添加列表的功能 在次梳理一下过程
- 给
JSX元素,组件Button按钮绑定事件
<Button type="primary" onClick={this.handleAddClick}>提交</Button>
// 添加列表的操作
    handleAddClick(){
        console.log("添加按钮执行了");
        // 定义action动作
        const action = {
            type: 'addInputcontent'
        }
        store.dispatch(action); // 还要将action传递给dispatch,这样store才会接收到,这是改变store数据的唯一的方法,必须要通过派发一个action给store,必不可少的一步
    }
2
3
4
5
6
7
8
9
10
- 在
reducer函数中进行逻辑判断,数据变更等操作
if (action.type === 'addInputcontent') {
  const newState = JSON.parse(JSON.stringify(state));
  if (newState.inputValue === '') {
    message.error('输入表单内不能为空,请输入内容');
  } else {
    newState.list.push(newState.inputValue); // 往list数组中添加input的内容
    newState.inputValue = ''; // 提交表单内容后,让表单内容置空操作
    return newState; // 返回newState
  }
}
2
3
4
5
6
7
8
9
10
基于原有的代码,添加这两步就完成了一个添加列表的操作的 那么删除列表的功能怎么实现呢? 以下是实现的效果
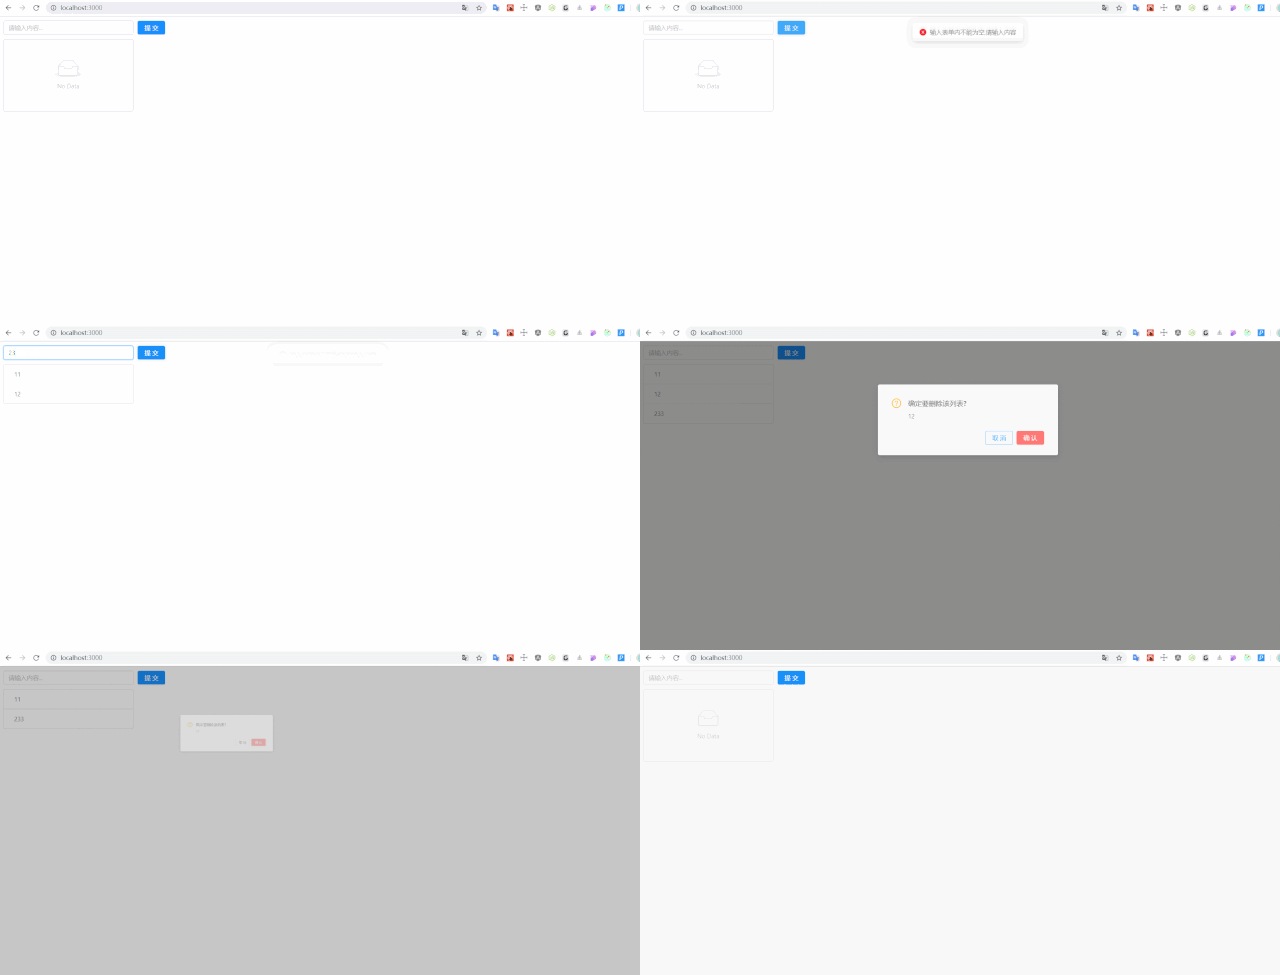
(删除列表)
import React from 'react';
import ReactDOM from 'react-dom';
import { Input, Button, List, message, Modal } from 'antd'; // 引入antd组件库
import 'antd/dist/antd.css'; // 引入antd样式

// 1. 创建一个store管理仓库,从redux库中引入一个createStore函数
import { createStore } from 'redux';

// 2. 引入createStore后,store并没有创建,需要调用createStore()后才有store
const store = createStore(
  reducer,
  window.__REDUX_DEVTOOLS_EXTENSION__ && window.__REDUX_DEVTOOLS_EXTENSION__()
); // 创建好reducer后,需要将reducer作为参数传到createStore当中去,这样store才能拿到reducer的state数据

// 3. 创建reducer函数,管理组件共享的数据状态以及一些动作
// reducer是一个纯函数,返回一个新的state给store
// 4. 初始化state值,将原先组件内部的状态的数据,移除到reducer里面去管理
function reducer(
  state = {
    inputValue: '',
    list: [],
  },
  action
) {
  console.log(state, action);
  if (action.type === 'handle_Input_Change') {
    // 对原有的上一次的state做一次深拷贝,在Redux中,reducer不允许直接修改state
    // const newState = Object.assign({}, state);与下面的是等价的
    const newState = JSON.parse(JSON.stringify(state));
    newState.inputValue = action.value; // 将新的value值赋值给newState
    return newState;
  }
  if (action.type === 'addInputcontent') {
    const newState = JSON.parse(JSON.stringify(state));
    if (Trim(newState.inputValue) === '') {
      message.error('输入表单内不能为空,请输入内容');
    } else {
      newState.list.push(newState.inputValue); // 往list数组中添加input的内容
      newState.inputValue = '';
      return newState; // 返回newState
    }
  }
  if (action.type === 'deletelist') {
    // 下面这个也是拷贝原对象的一种方式与上面等价
    const newState = Object.assign({}, state);
    newState.list.splice(action.index, 1);
    return newState;
  }
  return state;
}

// 去除前后空格
function Trim(str) {
  return str.replace(/(^\s*)|(\s*$)/g, '');
}
const { confirm } = Modal;
// TodoList组件
class TodoList extends React.Component {
  constructor(props) {
    super(props);
    // 5. 在组件内部通过getState()方法就可以拿到store里面的数据
    this.state = store.getState();
    // this环境的绑定
    this.handleInputChange = this.handleInputChange.bind(this);
    this.handleStoreChange = this.handleStoreChange.bind(this);
    this.handleAddClick = this.handleAddClick.bind(this);
    // 触发订阅,让store感知到state的变化
    store.subscribe(this.handleStoreChange); // 接收一个函数,重新获取store最新的数据,subscribe里面必须接收一个函数,否则是会报错的,这个订阅函数放在componentWillMount生命周期函数内调用操作也是可以的
  }
  // componentWillMount(){
  // store.subscribe(this.handleStoreChange);
  // }
  // 组件卸载,移除时调用该函数,一般取消,清理已注册的订阅,定时器的清理,取消网络请求,在这里面操作
  componentWillUnmount() {
    store.unsubscribe(this.handleStoreChange);
  }

  render() {
    return (
      <div style={{ margin: '10px 0 0 10px' }}>
        <div>
          <Input
            onChange={this.handleInputChange}
            value={this.state.inputValue}
            style={{ width: '300px', marginRight: '10px' }}
            placeholder="请输入内容..."
          />
          <Button type="primary" onClick={this.handleAddClick}>
            提交
          </Button>
        </div>
        <List
          style={{ width: '300px', marginTop: '10px' }}
          bordered
          dataSource={this.state.list}
          renderItem={(item, index) => (
            <List.Item onClick={this.handleDelList.bind(this, index, item)}>
              {item}
            </List.Item>
          )}
        />
      </div>
    );
  }

  handleInputChange(e) {
    console.log(e.target.value);
    // 定义action,确定一个操作,动作,注意action必须遵循一定的规范,是一个对象,type字段是确定要做的动作,类型,监听表单输入框的变化,value是输入框的值
    const action = {
      type: 'handle_Input_Change',
      value: e.target.value,
    };
    store.dispatch(action); // 通过store派发dispatch一个action,只有这里接收一个action,Reducer里面才能对新旧数据进行计算等操作
  }

  handleStoreChange() {
    console.log('handleStorechange,触发了');
    this.setState(store.getState()); // 触发setState重新获取store的数据,让input的数据与store保持同步了的
  }

  // 添加列表的操作
  handleAddClick() {
    console.log('添加按钮执行了');
    // 定义action动作
    const action = {
      type: 'addInputcontent',
    };
    store.dispatch(action); // 还要将action传递给dispatch,这样store才会接收到
  }

  // 删除列表操作
  handleDelList(index, item) {
    this.showDeleteConfirm(index, item);
  }

  showDeleteConfirm(index, item) {
    const action = {
      type: 'deletelist',
      index: index,
    };
    confirm({
      title: '确定要删除该列表?',
      content: item,
      okText: '确认',
      okType: 'danger',
      cancelText: '取消',
      onOk() {
        console.log('OK');
        store.dispatch(action); // 想要改变store的数据,必须通过dispatch派发一个action
      },
      onCancel() {
        console.log('Cancel');
      },
    });
  }
}
const container = document.getElementById('root');

ReactDOM.render(<TodoList />, container);
2
3
4
5
6
7
8
9
10
11
12
13
14
15
16
17
18
19
20
21
22
23
24
25
26
27
28
29
30
31
32
33
34
35
36
37
38
39
40
41
42
43
44
45
46
47
48
49
50
51
52
53
54
55
56
57
58
59
60
61
62
63
64
65
66
67
68
69
70
71
72
73
74
75
76
77
78
79
80
81
82
83
84
85
86
87
88
89
90
91
92
93
94
95
96
97
98
99
100
101
102
103
104
105
106
107
108
109
110
111
112
113
114
115
116
117
118
119
120
121
122
123
124
125
126
127
128
129
130
131
132
133
134
135
136
137
138
139
140
141
142
143
144
145
146
147
148
149
150
151
152
153
154
155
156
157
158
159
实现删除列表的过程与添加列表差不多
- 给列表绑定事件,添加事件处理函数
<List
      style={{ width: '300px',marginTop:'10px'}}
      bordered
      dataSource={this.state.list}
      renderItem={(item,index) => <List.Item onClick={this.handleDelList.bind(this, index,item)}>{item}</List.Item>}/>

const { confirm } = Modal; // 记得引入这个,不然删除确认模态框不会生效的,底下调用了该确认函数
 // 删除列表操作
    handleDelList(index,item) {
        this.showDeleteConfirm(index, item);
    }

    showDeleteConfirm(index,item) {
        const action = {
            type: 'deletelist',
            index: index
        }
        confirm({
            title: '确定要删除该列表?',
            content: item,
            okText: '确认',
            okType: 'danger',
            cancelText: '取消',
            onOk() {
                console.log('OK');
                 store.dispatch(action); // 想要改变store的数据,必须通过dispatch派发一个action
            },
            onCancel() {
                console.log('Cancel');
            },
        });
    }
2
3
4
5
6
7
8
9
10
11
12
13
14
15
16
17
18
19
20
21
22
23
24
25
26
27
28
29
30
31
32
- 在
reducer函数中进行对公共组件数据逻辑的操作
if (action.type === 'deletelist') {
  // 下面这个也是拷贝原对象的一种方式,也很常用
  const newState = Object.assign({}, state);
  newState.list.splice(action.index, 1); // 这是删除当前列表的核心方法,通过数组的splice方法实现,第一个参数代表的是删除哪个,第二个是删除一个
  return newState;
}
2
3
4
5
6
至于上面添加了一个当删除列表时,模态框的确认操作,至于添加一些组件是放在 reducer 里面还是放在外面,要视具体的业务逻辑而定
比如这里的删除确认模态框的,点击列表时,弹出是否删除的模态框,而具体是否要删除,应当在onOk这个函数里面进行派发action的, 如果你放到reducer里面做处理,那么始终会出现一些问题的,注意逻辑的操作顺序
文章写到这里,一个 todolist 的添加,删除操作就完成了,当然看到这样的代码,这么一个小小的 demo 操作,绕来绕去,估计奔溃了的,这样的代码堆叠在一起肯定是不行的
在后续的学习当中,我们将会把store,reducer,以及action进行分开独立管理的,之所以写在一个文件里,是方便后续怎么样将store,reducer,以及action抽离出去的
如果一上来就拆分,在各个文件之间进行切换,对于初学者,是很容易绕晕的.当然如果你是大神,就另当别论了的
上面的代码是次要的,重要的是理清Redux中store,React Component,action creators,reducer相互之间的关系,如果不清晰他们之间的关系,在遇到复杂的大型项目时,各个文件切来切去的,绝对是一头雾水,懵逼的,维护起来也是想死的心都有
# 结语
本文并不是什么高大上的内容,主要是对学习 Redux 的一个小小的初探,在真正实际项目中,复杂度远不止像这样的一个例子的,但是作为入门,todolist确实能让自己对Redux有一定的认识
也许你会觉得这么个简单的例子,竟然这么多代码,使用 vue 的话,几行代码就搞定了,Vue 中也有 vuex 这样的数据流管理框架,使用起来也是大同小异,两个各有优点,都很强
使用 React 编写代码更偏向底层一些的,虽然 Redux 比较绕,但都是有固定的套路流程的,其中理解 Redux 的工作流程是非常重要的
主要开始用ant-design这个 UI 组件库对todolist做了一个简单的布局,然后如何将组件的数据抽离到 Redux 中去管理
组件如何获取Redux中store的数据,以及怎么更新store的数据的更新,在上文当中都有与之对应的操作和解释
用几句简单话:概括下使用 Redux 的流程
- 安装
redux,然后从redux中引入createStore这个方法,并调用它,从而创建store - 紧着在创建
reducer纯函数,在reducer里面进行state的逻辑操作,reducer的返回值取决于state与action这个的决定,最终该函数的返回的最新结果会返回给store,完成新旧数据的替换 - 而在组件中如何获取 store 的数据,是通过
getState方法进行获取store中的所有状态 - 如何保持页面的组件与 store 数据同步更新,需要注册订阅
subscribe方法,该方法接收一个函数,在该接收的函数内触发重新获取store的数据 更多细枝末节内容,可见上文


