# 分离容器组件,UI 组件(无状态组件
# 快速导航
# 前言
至今为止,关于 React 中的组件已经接触到了有很多,用类class声明的组件,函数式funtion关键字声明的组件,以及样式组件(styled-components),对于前面几节当中已经用Redux实现了一个todolist,但是代码依旧不够完美,我们继续进行拆分的
在本节中,你将学习到,如何拆分容器组件,UI 组件(无状态组件),让组件尽可能的保持功能的单一,减少组件的状态的
# 容器组件(聪明组件)
在使用Redux中,无非就是做两件事情
- 如何获取
store的状态(组件中通过getState方法获取),并且初始化组件的状态(在Reducer纯函数中初始化),同时还需要监听store的状态改变(通过store触发subscribe函数),当组件需要更改store状态时,需要通过dispatch派发action对象,然后在Reducer纯函数里面根据state以及action,返回最新的state给store - 根据当前的
props和state,渲染出用户界面
在React开发里,让一个组件专注做一件事情,是封装组件的一个基本原则,如果你发现编写的组件做的事情太多了,那么就可以把组件拆分成若干粒度的小组件的,让每个组件只专注的做自己的事情
例如:在我们上几节代码中的 Todolist 的代码中,尽管我们把数据已经抽离放到 store 当中进行存储了的,但是依旧有许多逻辑,组件的渲染都杂糅在一个文件当中的 如下代码所示
import React, { Component } from 'react';
import { Input, Button, List, Modal } from 'antd'; // 引入antd组件库
import 'antd/dist/antd.css'; // 引入antd样式
import {
  getInputChangeAction,
  getAddInputContentAction,
  getDeleteListAction,
} from '../store/actionCreators';
import store from '../store/index'; // 引入store

const { confirm } = Modal;
// TodoList组件
class TodoList extends Component {
  constructor(props) {
    super(props);
    // 在组件内部通过getState()方法就可以拿到store里面的数据
    this.state = store.getState();
    // this环境的绑定
    this.handleInputChange = this.handleInputChange.bind(this);
    this.handleStoreChange = this.handleStoreChange.bind(this);
    this.handleAddClick = this.handleAddClick.bind(this);
    // 触发订阅,让store感知到state的变化
    store.subscribe(this.handleStoreChange); // 接收一个函数,重新获取store最新的数据,subscribe里面必须接收一个函数,否则是会报错的,这个订阅函数放在componentWillMount生命周期函数内调用操作也是可以的
  }
  // componentWillMount(){
  // store.subscribe(this.handleStoreChange);
  // }
  // 组件卸载,移除时调用该函数,一般取消,清理已注册的订阅,定时器的清理,取消网络请求,在这里面操作
  componentWillUnmount() {
    store.unsubscribe(this.handleStoreChange);
  }

  render() {
    return (
      <div style={{ width: '600px', margin: '100px auto' }}>
        <div>
          <Input
            onChange={this.handleInputChange}
            value={this.state.inputValue}
            style={{ width: '300px', marginRight: '10px' }}
            placeholder="请输入内容..."
          />
          <Button type="primary" onClick={this.handleAddClick}>
            提交
          </Button>
        </div>
        <List
          style={{ width: '300px', marginTop: '10px' }}
          bordered
          dataSource={this.state.list}
          renderItem={(item, index) => (
            <List.Item onClick={this.handleDelList.bind(this, index, item)}>
              {item}
            </List.Item>
          )}
        />
      </div>
    );
  }

  handleInputChange(e) {
    const action = getInputChangeAction(e.target.value);
    store.dispatch(action);
  }

  handleStoreChange() {
    console.log('handleStorechange,触发了');
    this.setState(store.getState()); // 触发setState重新获取store的数据,让input的数据与store保持同步了的
  }

  // 添加列表的操作
  handleAddClick() {
    const action = getAddInputContentAction();
    store.dispatch(action);
  }

  // 删除列表操作
  handleDelList(index, item) {
    this.showDeleteConfirm(index, item);
  }

  showDeleteConfirm(index, item) {
    const action = getDeleteListAction(index);
    confirm({
      title: '确定要删除该列表?',
      content: item,
      okText: '确认',
      okType: 'danger',
      cancelText: '取消',
      onOk() {
        console.log('OK');
        store.dispatch(action);
      },
      onCancel() {
        console.log('Cancel');
      },
    });
  }
}

export default TodoList;
2
3
4
5
6
7
8
9
10
11
12
13
14
15
16
17
18
19
20
21
22
23
24
25
26
27
28
29
30
31
32
33
34
35
36
37
38
39
40
41
42
43
44
45
46
47
48
49
50
51
52
53
54
55
56
57
58
59
60
61
62
63
64
65
66
67
68
69
70
71
72
73
74
75
76
77
78
79
80
81
82
83
84
85
86
87
88
89
90
91
92
93
94
95
96
97
98
99
100
101
上面的TodoList组件做了两件事情,一个是获取store中的数据,另一个就是渲染组件
我们可以把这个组件进一步的拆分成两个组件,分别承担着不同的任务,然后把两个组件嵌套起来,完成一个大组件所有的功能
关于组件的嵌套问题,涉及到一个父子组件(外部组件与内部组件),在组件当中调用的地方位置处,可以视它为子(内部)组件,父子组件只是一个相对的概念,把承担负责和redux中store打交道的组件称为父组件(外层),也叫做容器组件(聪明组件),它干的事情比较多,有复杂的业务逻辑,比如上面的 TodoList 就可以称为一个聪明组件
而对于承担只负责页面的渲染的组件,也就是render函数内的返回的内容,它处于内层,可以将它独立抽离出来封装成一个 UI 组件,它也叫做为展示层组件,也叫做傻瓜组件,因为它不具备任何逻辑,功能比较单一,只负责页面填充渲染
# UI 组件(傻瓜组件/无状态组件)
UI 组件:纯函数,没有任何副作用,给指定的输入,有指定的输出的函数,换句话说,只根据外部组件的 props 进行渲染组件的
好处:拆分成容器组件与 UI 组件,不仅仅是功能上的分离,还有就是它无状态了,让 UI 组件只根据props来渲染UI,不需要state,让UI组件无状态,是拆分组件的目的,这样维护起来比较方便,保持各组件的功能单一,组件的状态交给容器组件去维护,容器组件通过 props 把状态传递给 UI 组件
在根目录下创建一个components文件夹,然后将上面父组件的TodoList的render函数返回的内容,单独封装成一个组件的,在这里命名为TodoListUI.js
import React from 'react';
import { Input, Button, List, Modal } from 'antd'; // 引入antd组件库
import 'antd/dist/antd.css'; // 引入antd样式

// UI组件,当然也是可以用function关键字声明组件的
const TodoListUI = (props) => {
  return (
    <div style={{ width: '600px', margin: '100px auto' }}>
      <div>
        <Input
          onChange={props.handleInputChange}
          value={props.inputValue}
          style={{ width: '300px', marginRight: '10px' }}
          placeholder="请输入内容..."
        />
        <Button type="primary" onClick={props.handleAddClick}>
          提交
        </Button>
      </div>
      <List
        style={{ width: '300px', marginTop: '10px' }}
        bordered
        dataSource={props.list}
        renderItem={(item, index) => (
          <List.Item
            onClick={(index, item) => props.handleDelList(index, item)}
          >
            {item}
          </List.Item>
        )}
      />
    </div>
  );
};

export default TodoListUI;
2
3
4
5
6
7
8
9
10
11
12
13
14
15
16
17
18
19
20
21
22
23
24
25
26
27
28
29
30
31
32
33
34
35
36
需要要注意的是,当是用函数式声明的组件时,接收父组件的传来的props值,应该用props去接收,如果是用class声明的组件,则用this.props去接收,子组件从父组件中接受props值,在子组件内没有涉及到状态state了
至于上面子组件接收props代码,其实还可以在优化一下,利用解构赋值
const { inputValue, handleInputChange, handleAddClick, handleDelList } = props;
// 此时render函数里面就要更改一下的
<div style={{ width: '600px', margin: '100px auto' }}>
  <div>
    <Input
      onChange={handleInputChange}
      value={inputValue}
      style={{ width: '300px', marginRight: '10px' }}
      placeholder="请输入内容..."
    />
    <Button type="primary" onClick={handleAddClick}>
      提交
    </Button>
  </div>
  <List
    style={{ width: '300px', marginTop: '10px' }}
    bordered
    dataSource={props.list}
    renderItem={(item, index) => (
      <List.Item onClick={(index, item) => handleDelList(index, item)}>
        {item}
      </List.Item>
    )}
  />
</div>;
2
3
4
5
6
7
8
9
10
11
12
13
14
15
16
17
18
19
20
21
22
23
24
25
而在父组件(TodoList)中,如下所示,主要是将父组件中的render函数返回的内容,直接返回一个组件的,而子组件的渲染通过外部的props值给传进去,关注render函数的返回内容
import React, { Component } from 'react';
import { Modal } from 'antd';
import TodoListUI from '../components/TodoListUI'; // 引入TodoListUI组件

import {
  getInputChangeAction,
  getAddInputContentAction,
  getDeleteListAction,
} from '../store/actionCreators';
import store from '../store/index'; // 引入store

const { confirm } = Modal;
// TodoList组件
class TodoList extends Component {
  constructor(props) {
    super(props);
    // 5. 在组件内部通过getState()方法就可以拿到store里面的数据
    this.state = store.getState();
    // this环境的绑定
    this.handleInputChange = this.handleInputChange.bind(this);
    this.handleStoreChange = this.handleStoreChange.bind(this);
    this.handleAddClick = this.handleAddClick.bind(this);
    this.handleDelList = this.handleDelList.bind(this);
    // 触发订阅,让store感知到state的变化
    store.subscribe(this.handleStoreChange); // 接收一个函数,重新获取store最新的数据,subscribe里面必须接收一个函数,否则是会报错的,这个订阅函数放在componentWillMount生命周期函数内调用操作也是可以的
  }
  // componentWillMount(){
  // store.subscribe(this.handleStoreChange);
  // }
  // 组件卸载,移除时调用该函数,一般取消,清理已注册的订阅,定时器的清理,取消网络请求,在这里面操作
  componentWillUnmount() {
    store.unsubscribe(this.handleStoreChange);
  }

  render() {
    return (
      // render函数里面直接调用TodoListUI,自定义属性props值的方式
      <TodoListUI
        inputValue={this.state.inputValue}
        list={this.state.list}
        handleInputChange={this.handleInputChange}
        handleAddClick={this.handleAddClick}
        handleDelList={this.handleDelList}
      />
    );
  }

  handleInputChange(e) {
    const action = getInputChangeAction(e.target.value);
    store.dispatch(action);
  }

  handleStoreChange() {
    console.log('handleStorechange,触发了');
    this.setState(store.getState()); // 触发setState重新获取store的数据,让input的数据与store保持同步了的
  }

  // 添加列表的操作
  handleAddClick() {
    const action = getAddInputContentAction();
    store.dispatch(action);
  }

  // 删除列表操作
  handleDelList(index, item) {
    this.showDeleteConfirm(index, item);
  }

  showDeleteConfirm(index, item) {
    const action = getDeleteListAction(index);
    confirm({
      title: '确定要删除该列表?',
      content: item,
      okText: '确认',
      okType: 'danger',
      cancelText: '取消',
      onOk() {
        console.log('OK');
        store.dispatch(action);
      },
      onCancel() {
        console.log('Cancel');
      },
    });
  }
}
2
3
4
5
6
7
8
9
10
11
12
13
14
15
16
17
18
19
20
21
22
23
24
25
26
27
28
29
30
31
32
33
34
35
36
37
38
39
40
41
42
43
44
45
46
47
48
49
50
51
52
53
54
55
56
57
58
59
60
61
62
63
64
65
66
67
68
69
70
71
72
73
74
75
76
77
78
79
80
81
82
83
84
85
86
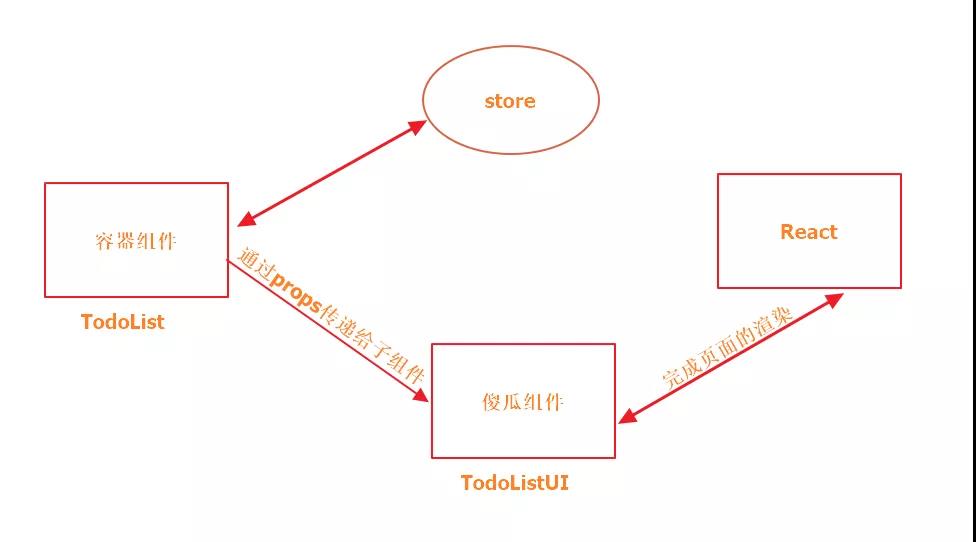
经过上面将父组件的拆分,分离出了 UI 组件,实际上就如下图的关系
# 结语
React 中,对于组件的职责功能划分,并没有严格的条条框框限定,这也并不是 React 独有的功能,在父组件中获取状态数据,而通过自定义属性 props 的方式,在组件内部通过 this.props 或者 props 进行接收,这样能够减少组件的状态分散在各处的
 分享
分享
 留言
留言
 解答
解答
 收藏
收藏