# React 进阶(2)-上手实践 Redux-如何获取 store 的数据
# 快速导航

# 前言
在前面的一文理解Redux中,已经知道了Redux的工作流程以及 Redux 的设计基本原则
它就是一个用于管理组件的公共数据状态的数据层框架,包括了Store,Reducer,React Component,Actions Creators四个部分
其中核心是Store,他们彼此之间的关系对于写Redux是非常重要的,宏观上讲:也可以将 Redux=reducer+Flux 的组合,代码就是文字描述的最佳的体现,解释
你将在本文学习到
- 编写
Redux的的基本流程 - 如何获取 store 中公共的数据,并展示到页面上
- 如何更改 store 的公共数据,实现组件的数据与 store 的同步更新
下面就一起来编写 Redux 代码的,以下是最终实现的效果图,添加,删除列表操作
# 使用 Ant-design 布局 todolist
对于初学者,一个简单的todolist例子对于入门redux是一个非常好的实践,这就好比刚写程序时的 Hello-world,虽然麻雀虽小,但是五胀俱全 在 React 中要使用 Redux 时,必须先要在命令行终端下进行安装
- 使用
npm或者cnpm,yarn(使用 yarn 时,需要先安装它,然后才可以使用)进行安装
yarn add redux
// 或者
npm install --save redux
2
3
安装完后,可以在根目录下 package.json 查看到 redux 的版本,如果有,说明已经安装成功了的
ant-design的使用可以参考官方文档 (opens new window)
同样也是需要先安装,然后在项目中使用
yarn add antd
然后在index.js中引入样式
import 'antd/dist/antd.css';
当然你也可以按需加载组件的方式,具体配置可以参照官方文档
以下是 index.js 代码
点击即可查看代码
import React from 'react';
import ReactDOM from 'react-dom';
import { Input, Button, List } from 'antd'; // 引入antd组件库
import 'antd/dist/antd.css'; // 引入antd样式

// TodoList组件
class TodoList extends React.Component {
  constructor(props) {
    super(props);
    // 组件内部的初始化状态数据
    this.state = {
      inputValue: 'itclanCoder', // input表单初始值
      list: ['itclanCoder', '川川', '学习Redux'], // 下方列表展示的数据
    };
  }
  render() {
    return (
      <div style={{ margin: '10px 0 0 10px' }}>
        <div>
          <Input
            value={this.state.inputValue}
            style={{ width: '300px', marginRight: '10px' }}
            placeholder="请输入内容..."
          />
          <Button type="primary">提交</Button>
        </div>
        <List
          style={{ width: '300px', marginTop: '10px' }}
          bordered
          dataSource={this.state.list}
          renderItem={(item) => <List.Item>{item}</List.Item>}
        />
      </div>
    );
  }
}
const container = document.getElementById('root');

ReactDOM.render(<TodoList />, container);
2
3
4
5
6
7
8
9
10
11
12
13
14
15
16
17
18
19
20
21
22
23
24
25
26
27
28
29
30
31
32
33
34
35
36
37
38
39
最终渲染的 UI 效果如下所示
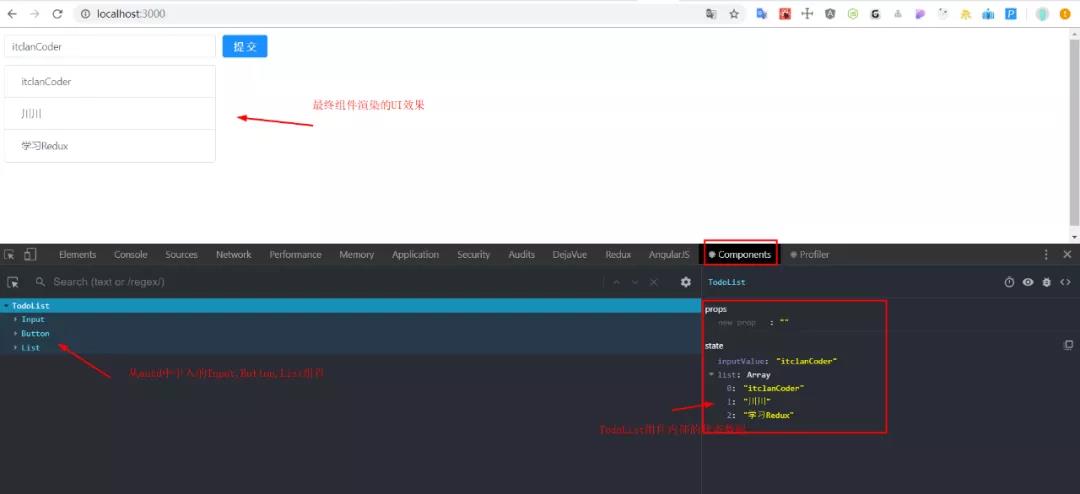
在控制台中可以多查看组件state的各个状态的,有助于理解React的
在上面的代码中,我们发现组件内部的状态数据是放在当前组件的 state 进行存储管理的,对于这种小的 demo 例子,杀鸡焉用宰牛刀使用 Redux 未免有些大才小用
但是如果组件非常的业务逻辑非常复杂,状态特别多,那么使用 Redux 的优点就非常明显了的
下面引入 redux,同样能够达到同样的效果,放上上一节的理解 Redux 的工作流程图

点击即可查看
import React from 'react';
import ReactDOM from 'react-dom';
import { Input, Button, List } from 'antd'; // 引入antd组件库
import 'antd/dist/antd.css'; // 引入antd样式

// 1. 创建一个store管理仓库,从redux库中引入一个createStore函数
import { createStore } from 'redux';

// 2. 引入createStore后,store并没有创建,需要调用createStore()后才有store
const store = createStore(reducer); // 创建好reducer后,需要将reducer作为参数传到createStore当中去,这样store才能拿到reducer的state数据

// 3. 创建reducer函数,管理组件共享的数据状态以及一些动作
// reducer是一个纯函数,返回一个新的state给store
// 4. 初始化state值,将原先组件内部的状态的数据,移除到reducer里面去管理
function reducer(
  state = {
    inputValue: 'itclanCoder',
    list: ['itclanCoder', '川川', '学习Redux'],
  },
  action
) {
  return state;
}

// TodoList组件
class TodoList extends React.Component {
  constructor(props) {
    super(props);
    // 5. 在组件内部通过getState()方法就可以拿到store里面的数据,该方法能够获取到store上存储的所有状态
    this.state = store.getState();
  }
  render() {
    return (
      <div style={{ margin: '10px 0 0 10px' }}>
        <div>
          <Input
            value={this.state.inputValue}
            style={{ width: '300px', marginRight: '10px' }}
            placeholder="请输入内容..."
          />
          <Button type="primary">提交</Button>
        </div>
        <List
          style={{ width: '300px', marginTop: '10px' }}
          bordered
          dataSource={this.state.list}
          renderItem={(item) => <List.Item>{item}</List.Item>}
        />
      </div>
    );
  }
}
const container = document.getElementById('root');

ReactDOM.render(<TodoList />, container);
2
3
4
5
6
7
8
9
10
11
12
13
14
15
16
17
18
19
20
21
22
23
24
25
26
27
28
29
30
31
32
33
34
35
36
37
38
39
40
41
42
43
44
45
46
47
48
49
50
51
52
53
54
55
上面的实例代码中,完成了将原先定义在组件内部的状态数据抽离到 Redux 中的 reducer 去管理,在当前组件内部通过 getState()方法拿到 state 数据,最终渲染到页面上
# 梳理一下 Redux 的使用流程
- 命令行终端下安装 redux 第三方库
yarn add redux
- 在项目中引入
redux库,同时创建一个store仓库,这是通过调用createStore函数实现的
import { createStore } from 'redux';
const store = createStore(); // 调用createStore函数才会真正的创建一个store
2
- 创建
reducer函数,用于存储公共组件的数据状态,它是一个纯函数,用于返回组件的状态
/*
 reducer是一个纯函数,接收两个参数,state和action其中state存储的就是组件的公共状态的,而action就是组件派发的动作,reducer的最终结果是由state和action共同决定的,后面会接着讲action
*/
function reducer(state, action) {
  return state;
}
2
3
4
5
6
- 在
reducer创建好之后,需要把reducer传递给createStore函数当中去,这样 store 就拿到了 reducer 里面的数据,这一步是必须要做的,否则就会拿不到reducer中 state 的数据
const store = createStore(reducer); // reducer函数必须传递给createStore函数中去,否则页面无法获取store的数据
- 组件内如何获取 store 中数据,通过调用
getState方法获取store中的数据,该方法能够获取到store上存储的所有状态,该方法放置的位置是在constructor函数里面
this.state = store.getState(); // getState方法能够获取store中的所有状态
- 组件的渲染
<Input value={ this.sate.inputValue }>
<List dataSource={this.state.list} />
2
上面的过程:其实完成的就是 Redux 工作流中的右边的内容
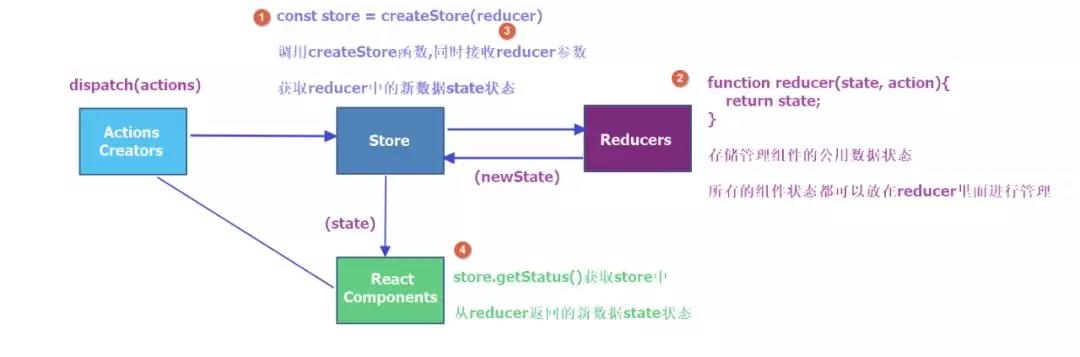
整个过程总结几句话就是
引入redux库,并调用createStore函数,从而创建了store,紧接着创建reducer函数,用于管理组件公共的状态数据,返回组件的最新的状态数据给 store
其结果由state和action共同决定,然后将创建的reducer函数作为参数,让createStore函数接收.
进而store就获取到了reducer函数里面的组件公共存储的数据,当组件外部想要拿 store 的公共数据时
于是引入 store,并通过 getState 这个函数就可以获取 store 中的所有数据,最终可将数据渲染到页面上
# 结语
本文并不是什么高大上的内容,主要是对学习 Redux 的一个小小的初探
用几句简单归纳下:组件如何获取 store 中的数据
- 安装
redux,然后从redux中引入createStore这个方法,并调用它,从而创建store, - 紧着在创建
reducer纯函数,在reducer里面进行state的逻辑操作,reducer的返回值取决于state与action这个的决定,最终该函数返回最新结果会返回给store,完成新旧数据的替换. - 而在组件中如何获取
store的数据,是通过getState方法进行获取store中的所有状态
那么如何保持页面的组件与store数据同步更新?添加,删除列表怎么实现呢?
 分享
分享
 留言
留言
 解答
解答
 收藏
收藏