# React 中组件的数据-props
# 前言
开发一个React应用,更多的是在编写组件,而React组件最小的单位就是React元素,编写组件的最大的好处,就是实现代码的复用
将一个大的应用按照功能结构等划分成若干个部分(组件),对每个部分(组件)进行分开管理,与组件相关的东西放在一起,达到高内聚的目的,而不同组件又各自独立管理达到低耦合的效果。
构建组件,本质上就是在编写javascript函数,而组件中最重要的是数据,在React中数据分两种:props和state,当定义一个组件时,它接收任意的形参(即props),并用于返回描述页面展示内容的React元素
无论props还是state,当他们任一一个发生改变时,都会引发render函数的重新渲染
一个 UI 组件所渲染的结果,就是通过props和state这两个属性在render方法里面映射生成对应的 HTML 结构
那么在写一个React组件的时候,究竟什么时候使用state,什么时候使用props呢?如何的划分组件的状态数据?
那么本节就是你想要知道的
# React 中的 props
当通过函数声明或者class自定义一个组件时,它会将JSX所接受的属性(attributes)转换为一对象传递给该定义时的组件
这个接收的对象就是props(property 的简写),props就是组件定义属性的集合,它是组件对外的接口,由外部通过JSX属性传入设置(也就是从外部传递给内部组件的数据)
一个 React 组件通过定义自己能够接收的 prop,就定义了自己对外提供的公共接口
每个定义的 React 组件应该都是独立存在的模块,组件之外的一切都是外部世界(组件),外部世界(组件)就是通过 prop 来和组件进行对话数据传递的
在 React 中,你可以将 prop 类似于 HTML 标签元素的属性,不过原生 HTML 标签的属性值都是字符串,即使是内嵌 js 表达式,也依然是字符串,而在 React 中,prop 的属性值类型可以任何数据类型(基本数据类型(number,String,null 等函数)或者对象)
当然如果是非字符串数据类型,在 JSX 中,必须要用花括号{}把 prop 值给包裹起来
这也是为什么 style 有两层花括号的原因:最外层代表的是 JSX 语法,意味着它是一个变量对象,而内层的花括号{}代表的是一个对象
在函数声明自定义的组件中,可以通过 props 获取组件的属性
如下所示:自定义一个 Button 组件,给组件添加各个属性值,渲染的结果如下所示

函数式组件:通过function关键字声明,组件首字母大写
import React, { Fragment, Component } from 'react';
import ReactDOM from 'react-dom';

// 函数式组件,定义一个Button组件,首字母大写
function Button(props) {
  console.log(props); // 将会把调用处组件的style属性给打印出来
  const btnStyles = {
    width: props.style.width,
    height: props.style.height,
    background: props.style.background,
    color: props.style.color,
    border: props.style.border,
    outline: props.style.outline,
    cursor: props.style.cursor,
  };
  return (
    <div>
      <button style={btnStyles}>按钮</button>
    </div>
  );
}

const btnStyle = {
  width: '100px',
  height: '40px',
  background: 'orange',
  color: '#fff',
  border: 'none',
  outline: 'none',
  cursor: 'pointer',
};

const container = document.getElementById('root');

ReactDOM.render(<Button style={btnStyle} />, container);
2
3
4
5
6
7
8
9
10
11
12
13
14
15
16
17
18
19
20
21
22
23
24
25
26
27
28
29
30
31
32
33
34
35
类class声明的组件: 通过Es6中的class声明,继承React.Component进行实现
import React, { Fragment, Component } from 'react';
import ReactDOM from 'react-dom';

// 类组件,通过class关键字声明使用
class Button extends Component {
  constructor(props) {
    super(props);
  }

  render() {
    console.log(this.props);
    // 这里利用Es6中的解构赋值
    const {
      width,
      height,
      background,
      color,
      border,
      outline,
      cursor,
    } = this.props.style;
    const btnStyles = {
      width, // 等于width:width
      height,
      background,
      color,
      border,
      outline,
      cursor,
    };
    return (
      <div>
        <button style={btnStyles}>按钮</button>
      </div>
    );
  }
}
// 该Button组件按钮自身拥有的属性
const btnStyle = {
  width: '100px',
  height: '40px',
  background: 'orange',
  color: '#fff',
  border: 'none',
  outline: 'none',
  cursor: 'pointer',
};

const container = document.getElementById('root');

ReactDOM.render(<Button style={btnStyle} />, container);
2
3
4
5
6
7
8
9
10
11
12
13
14
15
16
17
18
19
20
21
22
23
24
25
26
27
28
29
30
31
32
33
34
35
36
37
38
39
40
41
42
43
44
45
46
47
48
49
50
51
上述代码中分别使用了函数式组件与类声明的组件,在调用组件时,对组件设置了props值,而在组件内部通过 this.props 获取属性值
从而得出,父组件(外部组件)向子(内)组件传值是通过设置 JSX 属性的方式实现的,而在子组件内部获取父(外部)组件数据是通过 this.props 来获取的,也可以这么认为,props就是对外提供的数据接口
对于用类class声明的组件,读取 prop 的值,是通过 this.props 来获取的
首先用construcor定义了一个构造函数,并且给它接收了一个props形参,然后在constructor构造器函数内调用super(props)
这个是固定的写法,组件继承父类的一些方法,如果一个组件需要定义自己的构造函数,那么就一定要调用super(props),也就是继承了React.Component构造函数
至于为什么要调用super(props)方法,因为 Es6 采用的是先创建父类实例的 this,然后在用子类的构造函数修改 this
如果没有constructor构造器函数,调用super(),以及参数props,它是会报错的
在组件实例被构造之后,该组件的所有成员函数都无法通过this.props访问到父组件传递过来的props值,错误如下所示
ReferenceError: Must call super constructor in derived class before accessing 'this' or returning from derived constructor
关于constructor()构造器函数
这个constructor(props)构造器函数是自动就生成的,如果没有声明,React 会默认添加一个空的 construcor,并且会自动执行,有且只执行一次,可以将它视为钩子函数(生命周期函数)
这个constructor函数接收props形参数,接收外部组件传值的集合,只要组件内部要使用 prop 值,那么这个props参数是要必传的,否则的话在当前组件内就无法使用this.props接收外部组件传来的值
但是无论有没有constructor函数,render函数,子组件内都可以使用this.props获取组件外部的数据,它是默认自带的
constructor(props){
super(props);
}
2
3
至于写不写构造器函数,如果该自定义的组件不需要初始化state,不用进行方法的绑定(this坏境的设置),只是单纯的接收外部组件传来的props数据用作展示,并没有 UI 交互渲染动作
那么就不需要为该React组件实现构造函数
如果是这样,则更应该把它转换为函数式(无状态 UI)组件,因为它的效能是最高的
否则的话,那么就要编写constructor构造器函数,况且Es6编写类的方式提供了更多实用的功能,特定的条件下,该用还是要用的
一般而言,在React中,构造函数仅用于下面两种情况:
- 通过给
this.state赋值对象来初始化当前组件内部的state(状态) - 在
JSX中监听绑定事件处理函数(this坏境的绑定) - 在
constructor()函数中不要调用setState()方法,如果组件需要使用内部状态state,直接在构造函数中为this.state赋初始state值
constructor(props){
  super(props);

  // 不要在这里调用this.setState(),更改state状态数据
  this.state = {
   // 属性:属性值
   count: 0
  }
  //this.方法 = this.方法.bind(this);
   this.handleClick = this.handleClick.bind(this)
}
2
3
4
5
6
7
8
9
10
11
只能在构造函数中直接为this.state赋值,如果在其他地方法需要改变该state的值,应该使用this.setState()方法替代
注意:
如果把函数组件替换成类组件的写法,在子组件内部接收外部的props值时,需要将props更改成this.props的写法,反过来也是,类声明的组件替换成函数式(无状态)组件时,需要将this.props替换成props
而在用class类定义的组件时,一旦对组件初始化设置完成,该组件的属性就可以通过this.props获取得到,而这个this.props是不可更改的
不要轻易更改设置this.props里面的值,换句话说,组件的props属性只具备可读性,不能修改自身的props,这不区分是用函数声明的组件还是用class声明的组件,无法直接的更改props值
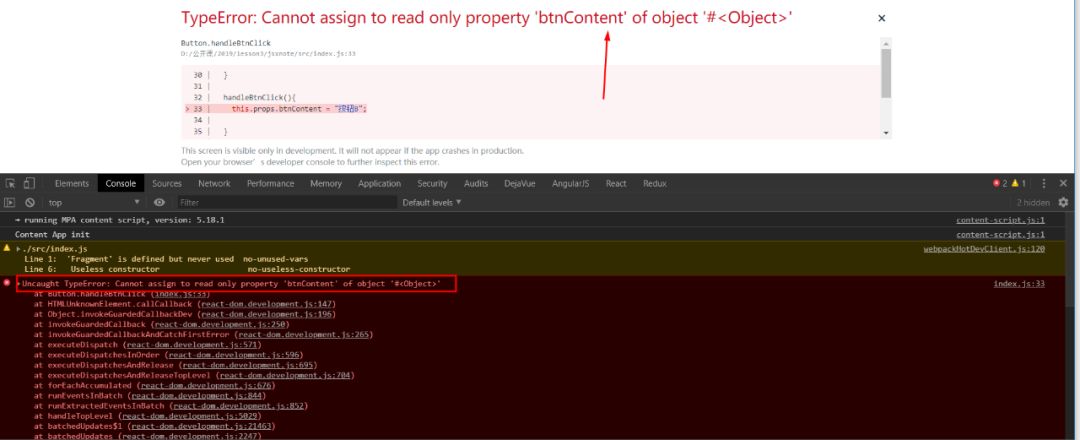
如下所示:点击按钮,想要改变外部传进去的props值,在代码中直接更改props值,是会报错的如下图错误所示:
import React, { Fragment, Component } from 'react';
import ReactDOM from 'react-dom';

// 类组件
class Button extends Component {
  constructor(props) {
    super(props);
  }

  render() {
    const {
      width,
      height,
      background,
      color,
      border,
      outline,
      cursor,
    } = this.props.style;
    const btnStyles = {
      width,
      height,
      background,
      color,
      border,
      outline,
      cursor,
    };
    return (
      <div>
        <button onClick={this.handleBtnClick.bind(this)} style={btnStyles}>
          {this.props.btnContent}
        </button>
      </div>
    );
  }

  handleBtnClick() {
    // 直接更改props的值,是会报错的,在React中不允许这么做
    this.props.btnContent = '按钮B';
  }
}

const btnStyle = {
  width: '100px',
  height: '40px',
  background: 'orange',
  color: '#fff',
  border: 'none',
  outline: 'none',
  cursor: 'pointer',
};
const container = document.getElementById('root');

ReactDOM.render(<Button btnContent="按钮A" style={btnStyle} />, container);
2
3
4
5
6
7
8
9
10
11
12
13
14
15
16
17
18
19
20
21
22
23
24
25
26
27
28
29
30
31
32
33
34
35
36
37
38
39
40
41
42
43
44
45
46
47
48
49
50
51
52
53
54
55
因为在React中,数据流是单向的,不能改变一个组件被渲染时传进来的 props
之所以这么规定,因为组件的复用性,一个组件可能在各个页面上进行复用,如果允许被修改的话,这个组件的显示形态会变得不可预测,当组件出现某些 bug 的时候,会给开发者带来困扰,调试将会是噩梦,无法定位,违背组件的设计原则了
但是这并不代表着 props 的值并不能被修改,有时候,由于业务的需求,我们是需要对 props 值进行修改的
如果想要修改,那么可以通过借助 React 内置的一个方法setState方法重新渲染的方式,把 props 传入组件当中,这样的话,由 props 属性决定这个组件的显示形态也会得到相应的改变
更改如下所示:
import React, { Fragment, Component } from 'react';
import ReactDOM from 'react-dom';

// 类组件
class Button extends Component {
  constructor(props) {
    super(props);
    // state是组件内部的状态
    this.state = {
      btnContent: this.props.btnContent,
    };
  }

  render() {
    const {
      width,
      height,
      background,
      color,
      border,
      outline,
      cursor,
    } = this.props.style;
    const btnStyles = {
      width,
      height,
      background,
      color,
      border,
      outline,
      cursor,
    };
    return (
      <div>
        <button onClick={this.handleBtnClick.bind(this)} style={btnStyles}>
          {this.state.btnContent}
        </button>
      </div>
    );
  }

  handleBtnClick() {
    // this.props.btnContent = "按钮B";
    this.setState({
      btnContent: '按钮B',
    });
  }
}

const btnStyle = {
  width: '100px',
  height: '40px',
  background: 'orange',
  color: '#fff',
  border: 'none',
  outline: 'none',
  cursor: 'pointer',
};

const container = document.getElementById('root');

ReactDOM.render(<Button btnContent="按钮A" style={btnStyle} />, container);
2
3
4
5
6
7
8
9
10
11
12
13
14
15
16
17
18
19
20
21
22
23
24
25
26
27
28
29
30
31
32
33
34
35
36
37
38
39
40
41
42
43
44
45
46
47
48
49
50
51
52
53
54
55
56
57
58
59
60
61
62

# 关于 React 中事件监听 this 的绑定
this的指向通常与它的执行上下文有关系,一般有以下几种方式
- 函数的调用方式影响
this的取值,如果作为函数调用,在非严格模式下,this指向全局window对象,在严格模式(use "strict")下,this指向undefined - 如果作为方法的调用,
this指向调用的对象,谁调用它,this就指向谁 - 作为构造器函数调用,this 指向该创建的实例化对象(类实例方法里面的 this 都指向这个实例本身)
- 通过
call,apply调用,this指向call和apply的第一个参数 - 在
React中,给JSX元素,监听绑定一个事件时,你需要手动的绑定this,如果你不进行手动bind的绑定,this会是undefined,在Es6中用class类创建的React组件并不会自动的给组件绑定this到当前的实例对象上
将该组件实例的方法进行 this 坏境绑定是 React 常用手段
代码如下所示:
import React, { Fragment, Component } from 'react';
import ReactDOM from 'react-dom';

// 类组件
class Button extends Component {
  constructor(props) {
    super(props);

    // this坏境的绑定,这是React里面的一个优化,constructor函数只执行一次
    this.handleBtnClick = this.handleBtnClick.bind(this);

    this.state = {
      btnContent: this.props.btnContent,
    };
  }

  render() {
    const {
      width,
      height,
      background,
      color,
      border,
      outline,
      cursor,
    } = this.props.style;
    const btnStyles = {
      width,
      height,
      background,
      color,
      border,
      outline,
      cursor,
    };
    return (
      <div>
        <button onClick={this.handleBtnClick} style={btnStyles}>
          {this.state.btnContent}
        </button>
      </div>
    );
  }

  handleBtnClick() {
    // this.props.btnContent = "按钮B";
    this.setState({
      btnContent: '按钮B',
    });
  }
}

const btnStyle = {
  width: '100px',
  height: '40px',
  background: 'orange',
  color: '#fff',
  border: 'none',
  outline: 'none',
  cursor: 'pointer',
};

const container = document.getElementById('root');

ReactDOM.render(<Button btnContent="按钮A" style={btnStyle} />, container);
2
3
4
5
6
7
8
9
10
11
12
13
14
15
16
17
18
19
20
21
22
23
24
25
26
27
28
29
30
31
32
33
34
35
36
37
38
39
40
41
42
43
44
45
46
47
48
49
50
51
52
53
54
55
56
57
58
59
60
61
62
63
64
65
当然如果不用这种手动绑定 this 的方式,用箭头函数也是可以的,箭头函数没有 this 的绑定,如下代码所示:
import React, { Fragment, Component } from 'react';
import ReactDOM from 'react-dom';

// 类组件
class Button extends Component {
   constructor(props){
   super(props);

   // this坏境的绑定,这是React里面的一个优化,constructor函数只执行一次
   // this.handleBtnClick = this.handleBtnClick.bind(this);
   this.state = {
     btnContent: this.props.btnContent
   }

}


render() {
const { width, height, background, color, border, outline,cursor} = this.props.style;
const btnStyles = {
  width,
  height,
  background,
  color,
  border,
  outline,
  cursor
}
return (
  <div>
    <button onClick = { () => { this.handleBtnClick() } } style = { btnStyles }>{ this.state.btnContent }</button>
   <!--或者以下写法-->
   <!--<button onClick = { this.handleBtnClick } style = { btnStyles }>{ this.state.btnContent }</button>-->
  </div>
);
}

handleBtnClick(){
  // this.props.btnContent = "按钮B";
  this.setState({
    btnContent: "按钮B"
  });
}
// handleBtnClick = () => {
// this.setState({
// btnContent: "按钮B"
// });
// }

}


const btnStyle = {
  width: "100px",
  height: "40px",
  background: "orange",
  color: "#fff",
  border: "none",
  outline: "none",
  cursor: "pointer"
}


const container = document.getElementById('root');

ReactDOM.render(<Button btnContent ="按钮A" style = { btnStyle } />, container);
2
3
4
5
6
7
8
9
10
11
12
13
14
15
16
17
18
19
20
21
22
23
24
25
26
27
28
29
30
31
32
33
34
35
36
37
38
39
40
41
42
43
44
45
46
47
48
49
50
51
52
53
54
55
56
57
58
59
60
61
62
63
64
65
66
67
68
对比两种实现方式,都是可以的,但是官方推荐使用bind绑定,使用bind不仅可以帮我们把事件监听方法中的this绑定到当前的组件实例上
bind后面还还可以设置第二个参数,把与组件相关的东西传给组件的,并在construcor构造器函数中进行初始化绑定,虽然bind的使用会创建一个新的函数,但是它在constructor中只会调用一次
而利用箭头函数,箭头函数中没有this的绑定,从性能上讲,它是会重复调用,进行额外的渲染,不如在构造器函数中进行 this 坏境的初始化手动绑定
在上面说到了prop值既然可以是任意数据类型,正好利用这一特性,子组件接收父组件用this.props可以获取属性,那么这个属性值可以是个方法,子组件也可以调用父组件的方法,来达到子组件向父组件传递数据
如下代码所示,最终的效果如下所示

import React, { Fragment, Component } from 'react';
import ReactDOM from 'react-dom';

// 定义一个父组件
class ParentComponent extends Component {
  constructor(props) {
    super(props);

    console.log('父组件props', props);
  }

  childContent(parm) {
    alert(parm);
  }

  render() {
    return (
      <Fragment>
        <div>{this.props.parentContent}</div>
        <ChildComponent
          getChildContent={this.childContent}
          childcon="我是子组件的内容"
        ></ChildComponent>
      </Fragment>
    );
  }
}
// 定义子组件
class ChildComponent extends Component {
  constructor(props) {
    super(props);
    console.log('子组件props', props);
  }

  handleChild = () => {
    const { getChildContent, childcon } = this.props;
    getChildContent(childcon);
  };

  render() {
    return (
      <Fragment>
        <div onClick={this.handleChild}>{this.props.childcon}</div>
      </Fragment>
    );
  }
}

const container = document.getElementById('root');

ReactDOM.render(
  <ParentComponent parentContent="我是父组件的内容" />,
  container
);
2
3
4
5
6
7
8
9
10
11
12
13
14
15
16
17
18
19
20
21
22
23
24
25
26
27
28
29
30
31
32
33
34
35
36
37
38
39
40
41
42
43
44
45
46
47
48
49
50
51
52
53
54
从上面的代码中,可以看得出,父组件中 JSX 的 prop 值可以是一个方法,在子组件想要把数据传递给父组件时,需要在子组件中调用父组件的方法,从而达到了子组件向父组件传递数据的形式
这种间接操作的方式在 React 中非常重要.当然你看到上面把子组件与父组件放在一个文件当中,或许看得不是很舒服,你可以把子组件单独的抽离出去,通过 Es6 中的export,import导出导入的方式是可以的(后面往往用的是这种方式)
在index.js同级目录下创建一个ChildComponent.js的文件
import React, { Component, Fragment } from 'react';

class ChildComponent extends Component {
  constructor(props) {
    super(props);
    console.log('子组件props', props);
  }

  handleChild = () => {
    const { getChildContent, childcon } = this.props;
    getChildContent(childcon);
  };

  render() {
    return (
      <Fragment>
        <div onClick={this.handleChild}>{this.props.childcon}</div>
      </Fragment>
    );
  }
}

export default ChildComponent;
2
3
4
5
6
7
8
9
10
11
12
13
14
15
16
17
18
19
20
21
22
23
在index.js中,通过import将ChildComponent组件进行引入,如下代码所示
import React, { Fragment, Component } from 'react';
import ReactDOM from 'react-dom';
import ChildComponent from './ChildComponent'; // 引入ChildComponent组件

// 定义一个父组件
class ParentComponent extends Component {
  constructor(props) {
    super(props);

    console.log('父组件props', props);
  }

  childContent(parm) {
    alert(parm);
  }

  render() {
    return (
      <Fragment>
        <div>{this.props.parentContent}</div>
        <ChildComponent
          getChildContent={this.childContent}
          childcon="我是子组件的内容"
        ></ChildComponent>
      </Fragment>
    );
  }
}
const container = document.getElementById('root');

ReactDOM.render(
  <ParentComponent parentContent="我是父组件的内容" />,
  container
);
2
3
4
5
6
7
8
9
10
11
12
13
14
15
16
17
18
19
20
21
22
23
24
25
26
27
28
29
30
31
32
33
34
# 使用 PropTypes 进行类型检查
既然prop是组件对外的接口,那么这个接口就必然要符合一定的数据规范,换句话说:也就是输入与输出的类型要保持一致,否则的话就会出问题
通过类型检查捕获一些错误,规避一些程序上的bug,React内置了一些类型检查的功能,要在组件的props上进行类型的检查,只需要做一些特定的propTypes属性配置即可
定义一个组件,为了该程序的严谨性,应该规范组件数据的如下方面
这个组件支持哪些prop
每个prop应该是什么样的格式
在React中,借助了第三方库prop-types来解决这一问题,通过PropTypes`来支持这一功能
命令行终端下,安装prop-types这个库
cnpm install --save prop-types
在你所要验证的组件内,引入prop-types库
import PropTypes from 'prop-types';

class PropTest extends Component {
  render() {
    return (
      <Fragment>
        <div>{this.props.propContent}</div>
      </Fragment>
    );
  }
}
// 类组件.propTypes对象下进行配置
PropTest.propTypes = {
  propContent: PropTypes.number,
};

const container = document.getElementById('root');

ReactDOM.render(<PropTest propContent="我是prop属性内容" />, container);
2
3
4
5
6
7
8
9
10
11
12
13
14
15
16
17
18
19
控制台错误显示如下:
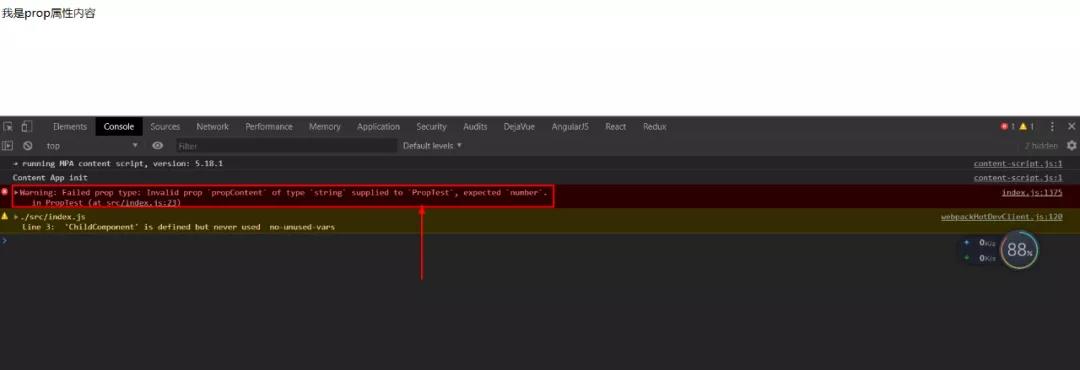
错误的信息是:提供给PropTest的类型是string的proppropContent,但期望的是number
具体的解决办法就是:要么更改传入属性值的prop类型,要么把校验类型进行更改与之对应的
PropType提供了一系列的验证方法,用于确保组件接收到的数据类型是有效准确的,一旦传入的prop值类型不正确时,控制台将会显示的警告,虽然程序不会报错,但是会出现警告.
有时候,对于外部传入组件内部的prop值,无论有没有传入,为了程序的健壮性,,需要判断 prop 值是否存在,我们往往需要设置一个初始默认值,如果不存在,就给一个默认初始值,当然你利用传入的 prop 进行“||”或字符进行处理也是可以的
在React中,可以配置defaultProps进行默认prop值的设置,代码如下所示
具体写法:
组件.defaultProps = {
  prop属性名称: 默认值,
};
2
3
import React, { Fragment, Component } from 'react';
import ReactDOM from 'react-dom';
import PropTypes from 'prop-types';

class PropTest extends Component {
  render() {
    return (
      <Fragment>
        <div>{this.props.propContent}</div>
      </Fragment>
    );
  }
}

PropTest.defaultProps = {
  propContent: '我是propTest组件的内容',
};

const container = document.getElementById('root');

ReactDOM.render(<PropTest />, container);
2
3
4
5
6
7
8
9
10
11
12
13
14
15
16
17
18
19
20
21
效果如下所示

它会显示默认设置的初始值,如果外部组件传了prop值,它会优先使用传入的prop值,覆盖默认设置的初始值
具体PropTypes下更多的方法,可参考官网手册PropTypes (opens new window),也可以查看npm中的prop-types这个库的使用
出于性能的考虑,在开发的时候可以发现代码中的问题,但是放在生产坏境中就不适合了
因为它不仅增加了代码行数,占用空间,而且还消耗 CPU 资源
折中的办法就是:在开发的时候代码定义propTypes,避免开发犯错,但在发布产品代码时,用一种自动的方式将propTypes去掉,这样在线上坏境代码时最优的
借助babel-plugin-transform-react-remove-prop-types这个第三方模块进行配置处理一下的,具体详细配置:可见 npm 官网对这个库的介绍的:https://www.npmjs.com/package/babel-plugin-transform-react-remove-prop-types
# 结语
本文主要讲述了React组件中的数据属性-props,它类似 HTML 标签的属性,但属性值可以是任意数据类型,数字 number,字符串 String,甚至函数,对象
并且要注意函数式声明(无状态)组件与 Es6 中类声明组件时,在子组件内部接收 props 的写法上的差异,当使用类 class 声明一个组件时,定义自己的构造器函数,一定要使用constructor构造器函数,并且设置接收props参数,以及调用super(props),如果不进行该设置,该组件下定义的成员私有方法(函数)将无法通过 this.props 访问到父组件传递过来的 prop 值
当然,在React中,规定了不能直接更改外部世界传过来的 prop 值,这个prop属性只具备读的能力,具体原因可见上文
如果非要更改,那么可以借助React提供的setState这一方法进行改变
值得一提的就是关于 this 坏境绑定的问题,在组件内的constructor构造器函数内使用 bind 的方式进行this手动绑定设置,具体详细内容可见上文
以及当知道如何定义组件中的 prop 数据,还有必要对外部组件传给内部组件的 prop 数据类型的校验,通过prop-types库来解决,PropTypes这个实例属性来对 prop 进行规格的设置,这样可以在运行代码时,可以根据propTypes判断外部组件是否整整的使用组件的属性,输入输出的类型是否一一对应,保持一致
 分享
分享
 留言
留言
 解答
解答
 收藏
收藏